Dakamaster
Just Hatched
Note: Original post in AmebaIoT Forum that supported with Dual Language:
Required Environment
RTL8720DN Dual-Band Wi-Fi board currently supports Windows XP/7/8/10 32-bits and 64-bits operating systems. In this documentation, please use Arduino IDE with version 1.8.15 or later.
Introduction to BW16
Realtek RTL8720DN is a Wi-Fi and Bluetooth IC that supports 2.4GHz and 5GHz dual bands for Wi-Fi communication, and Bluetooth Low Energy (BLE) 5.0. BW16 is a module manufactured by B&T, this module is a highly integrated Wi-Fi and Bluetooth module with the RTL8720DN as the main SoC (System on Chip), it can be regarded as an SoC for the Wi-Fi and Bluetooth application with typical SBCs.

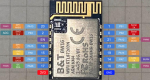
Please refer to the following figure and table for the pin diagram and function of RTL8720DN (BW16).

Setting up Development Environment
Step 1. Installing the Driver
First, connect RTL8720DN (BW16) to the computer via Micro USB:

If this is the first time you connect RTL8720DN (BW16) to your computer, here is something that you might take note of:

The pins LOG_UART_TX (GPIOA_7) and LOG_UART_RX (GPIOA_8) are used for program upload. However, the onboard USB-to-UART module is connected to LP_UART_TX (GPIOB_1) and LP_UART_RX (GPIOB_2) and thus cannot be used directly for program upload. You can choose to either use an external USB-to-UART module connected to GPIOA_7 and GPIOA_8, or you could short these pins together to use the on-board USB for program upload:
GPIOA_8 ––– GPIOB_1
GPIOA_7 ––– GPIOB_2
After connecting accordingly, the USB driver for RTL8720DN (BW16) will be automatically installed. You can check the COM port number in Device Manager of your computer:

Step 2. Set up Arduino IDE
From version 1.6.5, Arduino IDE supports third-party hardware. Therefore, we can use Arduino IDE to develop applications on RTL8720DN (BW16), and the basic examples of Arduino can run on RTL8720DN (BW16) too. Refer to the .
Arduino IDE can be downloaded in the Arduino website:
When the installation is finished, open Arduino IDE. To set up RTL8720DN (BW16) correctly in Arduino IDE, go to “File” -> “Preferences”.
And paste the following URL into the “Additional Boards Manager URLs” field: RTL8720DN (BW16) will be supported from v3.0.8 officially.
Next, go to “Tools” -> “Board” -> “Boards Manager”:

The “Boards Manager” requires about 10~20 seconds to refresh all hardware files (if the network is in bad condition, it may take longer). Every time the new hardware is connected, we need to reopen the Board Manager. So, we close the Boards Manager, and then open it again. Find “Realtek AmebaD Boards (32-bits ARM Cortex-M4 @200MHz)” in the list, click “Install”, then the Arduino IDE starts to download required files for AmebaD.

If you are facing GitHub downloading issue, please refer to the following link at “Download/Software[ZQ[3] [Z[4] Development Kit”. There are 3 sections.
1. “AmebaD_Arduino_patch1_SDK”, please select at least 1 of the SDKs. There are 5 latest released SDK options.
2. “AmebaD_Arduino_patch2_Tools”, please select according to your operating system. There are Windows, Linux, and macOS.
3. “AmebaD_Arduino_Source_Code”, this section is an optional download only wants to refer to the latest source code.
Download the files selected, then unzip (patch1 and patch2 are compulsory). There are “Install.doc”/“Install.pdf” for you to refer to installation steps. According to your system, please run the installation tool in the “Offline_SDK_installation_tool” folder.
After the installation tool running successfully, you may open Arduino IDE and proceed to “tools” -> “Board“ -> “Boards Manager…”. Try to find “Realtek AmebaD Boards (32-bits ARM Cortex-M4 @200MHz)” in the list, click “Install”, then the Arduino IDE starts to download the required files for AmebaD.
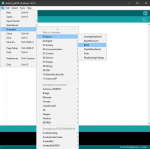
Finally, we select AmebaD as current connected board in “tools” -> “Board” -> “Ameba ARM (32-bits) Boards” ->” RTL8720DN(BW16)”:

References
For more information, please visit the following websites:
if you want to know more about our AmebaD Family (RTL8722DM & RTL8722DM-MINI) and ambd_arduino opensource SDK, please also visit:
Required Environment
RTL8720DN Dual-Band Wi-Fi board currently supports Windows XP/7/8/10 32-bits and 64-bits operating systems. In this documentation, please use Arduino IDE with version 1.8.15 or later.
Introduction to BW16
Realtek RTL8720DN is a Wi-Fi and Bluetooth IC that supports 2.4GHz and 5GHz dual bands for Wi-Fi communication, and Bluetooth Low Energy (BLE) 5.0. BW16 is a module manufactured by B&T, this module is a highly integrated Wi-Fi and Bluetooth module with the RTL8720DN as the main SoC (System on Chip), it can be regarded as an SoC for the Wi-Fi and Bluetooth application with typical SBCs.
RTL8720DN (BW16) has a smaller size than AmebaD and AmebaD-MINI [Z[2] as shown in the above figure. It uses Micro USB to supply power, which is common in many smart devices.Please refer to the following figure and table for the pin diagram and function of RTL8720DN (BW16).
| PIN name | GPIO INT | ADC | PWM | UART | SPI | I2C |
| GPIOA_7 | ✓ | ✓ | ||||
| GPIOA_8 | ✓ | ✓ | ||||
| GPIOA_12 | ✓ | ✓ | ✓ | |||
| GPIOA_13 | ✓ | ✓ | ✓ | |||
| GPIOA_14 | ✓ | ✓ | ||||
| GPIOA_15 | ✓ | ✓ | ||||
| GPIOA_25 | ✓ | ✓ | ✓ | |||
| GPIOA_26 | ✓ | ✓ | ✓ | |||
| GPIOA_27 | ✓ | |||||
| GPIOA_30 | ✓ | |||||
| GPIOB_1 | ✓ | ✓ | ||||
| GPIOB_2 | ✓ | ✓ | ||||
| GPIOB_3 | ✓ | ✓ |
Setting up Development Environment
Step 1. Installing the Driver
First, connect RTL8720DN (BW16) to the computer via Micro USB:
If this is the first time you connect RTL8720DN (BW16) to your computer, here is something that you might take note of:
The pins LOG_UART_TX (GPIOA_7) and LOG_UART_RX (GPIOA_8) are used for program upload. However, the onboard USB-to-UART module is connected to LP_UART_TX (GPIOB_1) and LP_UART_RX (GPIOB_2) and thus cannot be used directly for program upload. You can choose to either use an external USB-to-UART module connected to GPIOA_7 and GPIOA_8, or you could short these pins together to use the on-board USB for program upload:
GPIOA_8 ––– GPIOB_1
GPIOA_7 ––– GPIOB_2
After connecting accordingly, the USB driver for RTL8720DN (BW16) will be automatically installed. You can check the COM port number in Device Manager of your computer:
Step 2. Set up Arduino IDE
From version 1.6.5, Arduino IDE supports third-party hardware. Therefore, we can use Arduino IDE to develop applications on RTL8720DN (BW16), and the basic examples of Arduino can run on RTL8720DN (BW16) too. Refer to the .
Arduino IDE can be downloaded in the Arduino website:
When the installation is finished, open Arduino IDE. To set up RTL8720DN (BW16) correctly in Arduino IDE, go to “File” -> “Preferences”.
And paste the following URL into the “Additional Boards Manager URLs” field: RTL8720DN (BW16) will be supported from v3.0.8 officially.
Next, go to “Tools” -> “Board” -> “Boards Manager”:
The “Boards Manager” requires about 10~20 seconds to refresh all hardware files (if the network is in bad condition, it may take longer). Every time the new hardware is connected, we need to reopen the Board Manager. So, we close the Boards Manager, and then open it again. Find “Realtek AmebaD Boards (32-bits ARM Cortex-M4 @200MHz)” in the list, click “Install”, then the Arduino IDE starts to download required files for AmebaD.
If you are facing GitHub downloading issue, please refer to the following link at “Download/Software[ZQ[3] [Z[4] Development Kit”. There are 3 sections.
1. “AmebaD_Arduino_patch1_SDK”, please select at least 1 of the SDKs. There are 5 latest released SDK options.
2. “AmebaD_Arduino_patch2_Tools”, please select according to your operating system. There are Windows, Linux, and macOS.
3. “AmebaD_Arduino_Source_Code”, this section is an optional download only wants to refer to the latest source code.
Download the files selected, then unzip (patch1 and patch2 are compulsory). There are “Install.doc”/“Install.pdf” for you to refer to installation steps. According to your system, please run the installation tool in the “Offline_SDK_installation_tool” folder.
After the installation tool running successfully, you may open Arduino IDE and proceed to “tools” -> “Board“ -> “Boards Manager…”. Try to find “Realtek AmebaD Boards (32-bits ARM Cortex-M4 @200MHz)” in the list, click “Install”, then the Arduino IDE starts to download the required files for AmebaD.
Finally, we select AmebaD as current connected board in “tools” -> “Board” -> “Ameba ARM (32-bits) Boards” ->” RTL8720DN(BW16)”:
References
For more information, please visit the following websites:
- AmebaIoT Forum:
if you want to know more about our AmebaD Family (RTL8722DM & RTL8722DM-MINI) and ambd_arduino opensource SDK, please also visit:
- AmebaIoT official website: for more examples supported;
- Join our FB Forum (English version) to further discuss with us: ;